
A Guide to Using an Ophthalmoscope
Have you ever wondered how healthcare professionals examine eyes in detail?
One of the essential tools examiners use is an ophthalmoscope, with their bright, white illumination. The bright illumination allows the examiner to clearly see the important structures of the eye, arteries, veins, optic nerve and the retina.
Let's dive into a comprehensive guide on how to use an ophthalmoscope effectively.
First up: What is an Ophthalmoscope?
An ophthalmoscope is a handheld device used by healthcare professionals to examine the interior structures of the eye, such as the retina, optic nerve, and blood vessels. It consists of a light source, a magnifying lens, with various apertures and filters to adjust the size and focus of the light beam.
Further below, we're explain the various apertures and filters in more detail.
Why The Eye?
Direct observation of the structures of the fundus (eye) through an ophthalmoscope can show disease of the eye itself and may reveal abnormalities indictive of disease elsewhere in the body.
Amongst the most important of these are vascular changes due to diabetes, high blood pressure (hypertension) and swelling of the optic nerve due to papilledema or optic neuritis.
With a preliminary diagnosis of an imminently dangerous eye condition, such as acute glaucoma or retinal detachment is made by the examiner, prompt referral to an ophthalmologist may prevent irreversible damage.
Less urgent conditions, such as visual impairment due to cataract or vitreous floaters are recognised, the patient can be reassured and referred for further treatment.
Essentially, the eye serves as a window through which many valuable clinical evaluations may be made. All this helps to aid making the correct diagnosis.
An eye examination can give so much information about a patient’s well being, especially with the correct use of the ophthalmoscope makes it one of the most valuable tools available for diagnostic use.
Apertures & Filters Explained
-
 Micro - allows quick entry into small, undiluted pupils
 -
 Small - provides excellent view of fundus through an undiluted pupil
 -
 Large - general examination of the eye through dilated pupil
 -
 Fixation - graduated cross-hairs for measuring eccentric fixation or locating lesions
 -
 Slit - used to determine levels of lesions and tumours
 -
 Cobalt blue - used with fluorescein dye to view small lesions, abrasions and foreign objects on the cornea
 -
 Red-Free filter - filters out red light for easy identification of veins, arteries and nerve fibres
 -
 Polarising filter - virtually eliminates corneal reflection
How to Conduct an Ophthalmology Examination?
In order to conduct a successful examination of the fundus, the examining room should be either semi darkened or completely darkened. It is preferable to dilate the pupil when there is no pathologic contraindication, but much information can be obtained through the undiluted pupil.
The following steps will help the practitioner obtain satisfactory results:
1. For examination of the right eye, sit or stand at the patient’s right side.
2. Start with the smallest aperture
3. Take the ophthalmoscope in the right hand and hold it vertically in front of your own right eye with the light beam directed toward the patient and place your right index finger on the edge of the lens dial so that you will be able to change lenses easily if necessary
4. Dim room lights. Instruct the patient to look straight ahead at a distant object
5. Position the ophthalmoscope about 6 inches (15 cm) in front and slightly to the right (25º) of the patient and direct the light beam into the pupil. A red “reflex” should appear as you look through the pupil
6. Rest your left hand on the patient’s forehead and hold the upper lid of the eye near the eyelashes with the thumb. While the patient is fixating on the specified object, keep the “reflex” in view and slowly move toward the patient. The optic disc should come into view when you are about 1 to 2 inches (3-5 cm) from the patient. If it is not focused clearly, rotate lenses with your index finger until the optic disc is as clearly visible as possible. The hyperopic, or far-sighted, eye requires more “plus” (green numbers) lenses for clear focus of the fundus; the myopic, or near-sighted, eye requires “minus” (red numbers) lenses for clear focus
7. Now examine the disc for clarity of outline, colour, elevation and condition of the vessels. Follow each vessel as far to the periphery as you can. To locate the macula, focus on the disc, then move the light approximately 2 disc diameters temporally. You may also have the patient look at the light of the ophthalmoscope, which will automatically place the macula in full view. Look for abnormalities in the macula area. A red-free filter facilitates viewing of the centre of the macula
8. To examine the extreme periphery, instruct the patient to:
- Look up for examination of the superior retina
- Look down for examination of the inferior retina
- Look temporally for examination of the temporal retina
- Look nasally for examination of the nasal retina
This routine will reveal almost any abnormality that occurs in the fundus.
9. To examine the left eye, repeat the procedure outlined above but hold the ophthalmoscope in your left hand, stand at the patient’s left side and use your left eye
Tips for Overcoming Corneal Reflection:
One of the most troublesome barriers to a good view of the retina is the light reflected back into the examiner’s eye from the patient’s cornea—a condition known as corneal reflection.
There are three ways to minimise this:
- The Coaxial ophthalmoscope features a crossed linear polarising filter that may be used. The filter reduces corneal reflection by 99%. It is recommended that the polarising filter be used when corneal reflection is present
- Use the small aperture. However, this reduces the area of the retina illuminated
- Direct the light beam toward the edge of the pupil rather than directly through its centre. This technique can be perfected with practice
Use of The Fixation Target
Direct the patient to focus on the centre of the fixation target projected within the light beam. Simultaneously check the location of the pattern on the fundus. If the centre of the pattern does not coincide with the macula, eccentric fixation is indicated. In this procedure, the crossed linear polarizing filter is especially useful since it dramatically reduces reflections caused by the direct corneal light path.
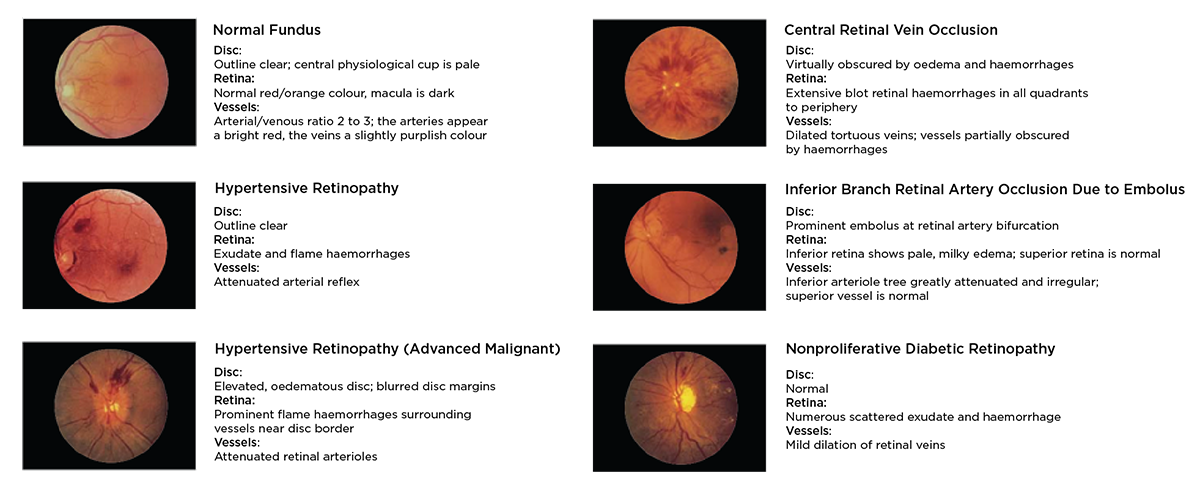
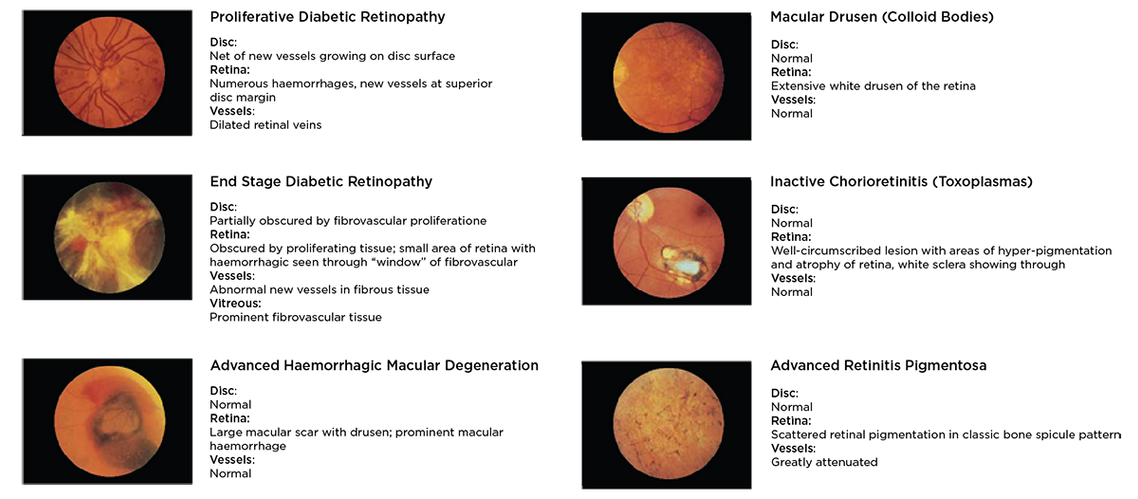
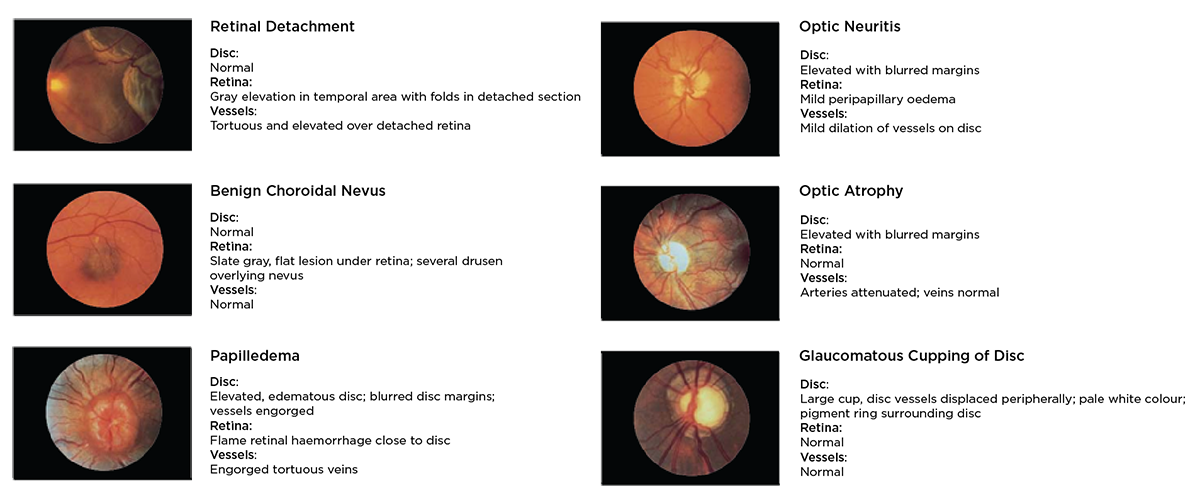
Common Pathologies of the Eye
Tips for Using an Ophthalmoscope
- Practice proper hand-eye coordination to ensure a steady view of the eye structures
- Communicate with the patient throughout the examination to ensure their comfort and cooperation
- Clean the ophthalmoscope after each use to prevent the spread of infections
By following these steps and tips, you can effectively use an ophthalmoscope to examine the eye structures with precision and accuracy. Remember, regular eye examinations are crucial for maintaining good eye health and detecting any potential issues early on.
Discover the Medisave Ophthalmoscope range!
Medisave is your your one-stop-shop for your ophthalmoscopy/fundoscopy needs.
Personalise YOUR ophthalmoscope the way YOU want it! Laser engraving is available across the range to your exact requirements, with various font/text options and a wide choice of emojis to choose from. Order online before 8pm to receive your personalised equipment next day!
We are official distributors of Welch Allyn, Keeler, Heine and Riester with a large stock holding ready for next day delivery! Need help choosing the right set? We’re more than happy to help advise, contact us on live chat or call us on 0800 804 6447.